Nearly one in three new-build homeowners in the UK reports a significant defect within the first two years of moving in — yet the majority of those defects are never formally inspected before the NHBC Buildmark or equivalent structural warranty expires. That gap between what builders hand over and what buyers actually receive is precisely where a professional building survey earns its fee many times over.
This guide cuts through the marketing gloss of modern housing estates to expose the recurrent construction failures found in post-2010 new-build homes. It also sets out exactly what a Level 3 Building Survey (formerly known as a Full Structural Survey) should test, photograph, and document before your warranty window closes — because once it does, the remediation bill lands squarely with you.
Key Takeaways 📋
- Post-2010 new-builds are not defect-free — faster build programmes, skills shortages, and value-engineering have introduced a predictable set of recurring faults.
- Thermal bridging, poor drainage detailing, and weak acoustic performance are the most commonly missed defects in modern UK estates.
- NHBC Buildmark warranties typically provide two years of builder responsibility and ten years of structural cover — commissioning a survey before Year 2 ends is critical.
- A RICS Level 3 Building Survey is the most appropriate inspection tool for identifying latent defects in new-build properties.
- Acting before the warranty expires gives homeowners legal leverage to compel builders to remedy defects at no cost.
Why Post‑2010 New‑Builds Are More Defect-Prone Than You Think
There is a widespread assumption that a brand-new home is a safe home. The reality is more complicated. The decade following 2010 saw the UK government push hard for accelerated housing delivery. Volume housebuilders responded by compressing build programmes, sub-contracting more aggressively, and substituting traditional craft skills with faster, system-based construction methods.
The result? A generation of homes built to tighter tolerances, with thinner margins for error — and those errors, when they occur, are often hidden behind plasterboard, floor screeds, and freshly painted render before any independent inspector sets foot on site.
"A new-build is not a guarantee of quality. It is a guarantee of newness." — A sentiment shared by RICS-accredited surveyors across the industry.
The Role of the NHBC Buildmark Warranty
The NHBC Buildmark warranty is the most common structural warranty attached to new-build homes in England and Wales. It operates in two distinct phases:
| Phase | Duration | Who Is Responsible? |
|---|---|---|
| Builder Warranty | Years 1–2 | The developer must fix defects |
| NHBC Structural Cover | Years 3–10 | NHBC covers structural defects only |
| After Year 10 | Expired | Homeowner bears all costs |
The critical insight here is that Years 1 and 2 are the most powerful — during this window, builders are legally obligated to remedy virtually any defect, not just structural ones. Commissioning a RICS Level 3 Building Survey before the two-year mark expires is one of the most cost-effective investments a new-build owner can make.
The Most Common Defects in Post‑2010 New‑Build Housing: What a Thorough Building Survey Should Uncover
Understanding which defects to look for is the first step. The following categories represent the highest-frequency findings in post-2010 new-build inspections across the UK.
1. 🌡️ Thermal Bridging and Insulation Failures
Thermal bridging occurs where heat escapes through a gap or weak point in the building's thermal envelope — typically at junctions between walls, floors, and roofs. Post-2010 homes were built to increasingly stringent energy efficiency standards under successive revisions to Part L of the Building Regulations. In theory, this should have eliminated cold bridging. In practice, poor workmanship at critical junctions has created a new category of defect.
Common thermal bridging locations in new-builds:
- 🔴 Roof-to-wall eaves junctions
- 🔴 Ground floor slab perimeter edges
- 🔴 Window and door reveals where cavity closers are omitted or misaligned
- 🔴 Steel lintels without thermal breaks
- 🔴 Balcony slab penetrations through external walls
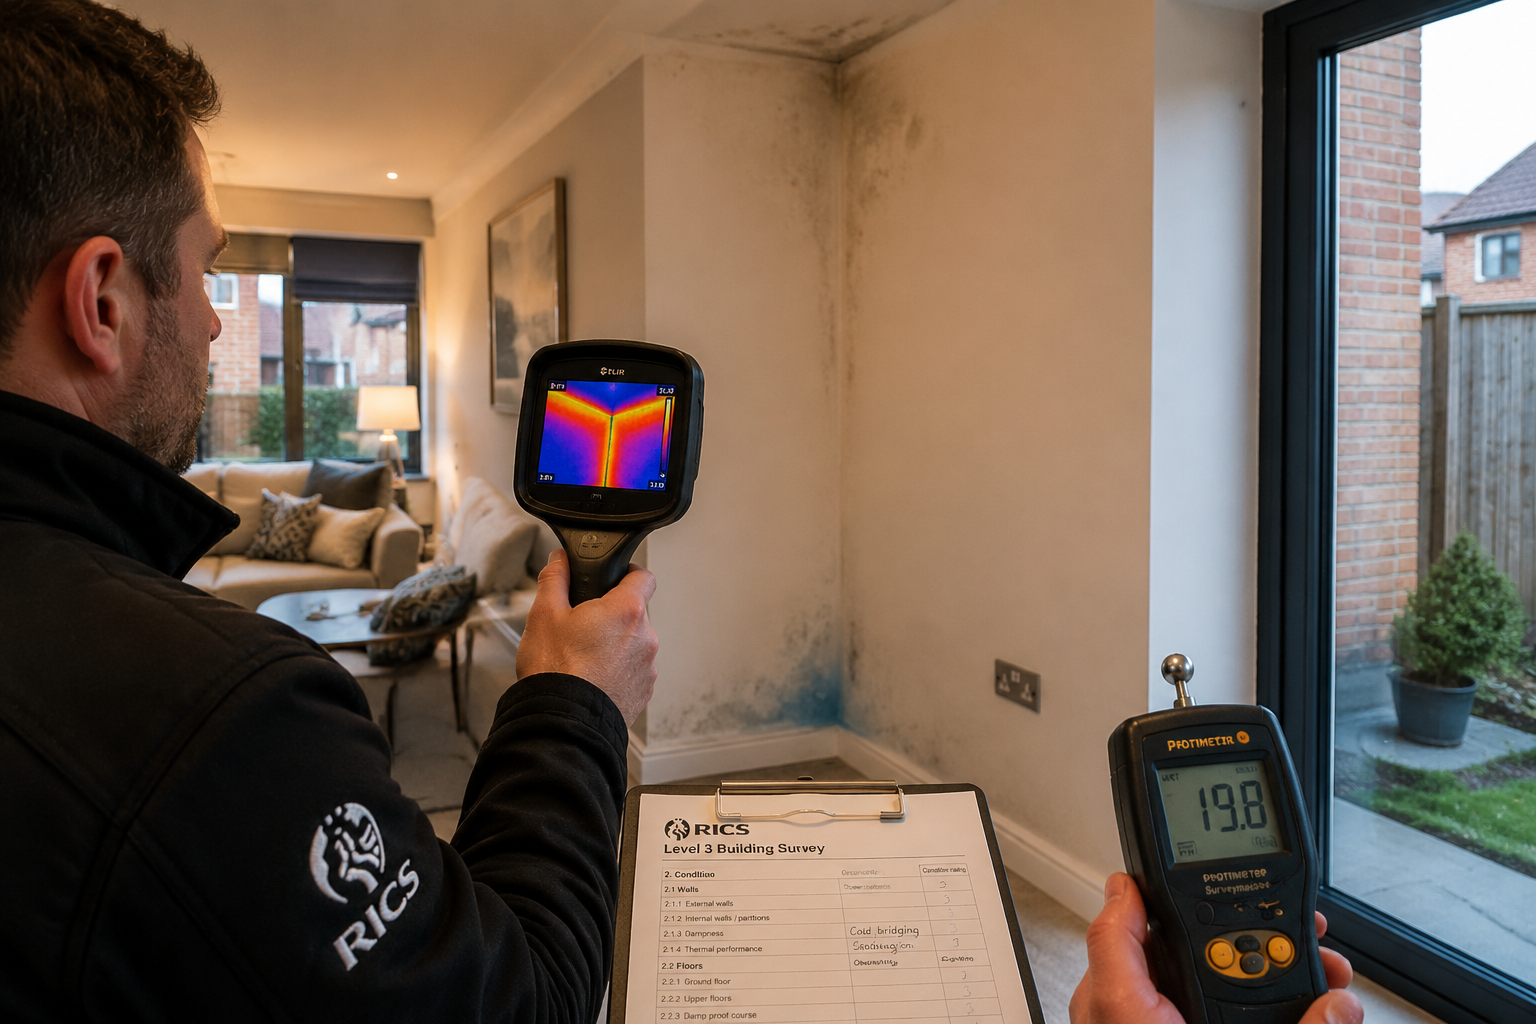
A thorough building survey should deploy a thermal imaging camera during cooler months to map surface temperature variations across walls and ceilings. Cold spots below 13°C on internal surfaces are a condensation risk and can lead to mould growth — a health hazard that is also a breach of the builder's warranty obligations.
2. 💧 Drainage Defects and Surface Water Management
Drainage failures are among the most expensive post-completion defects to remedy. In post-2010 estates, three recurring problems dominate:
a) Misaligned or poorly jointed underground drainage
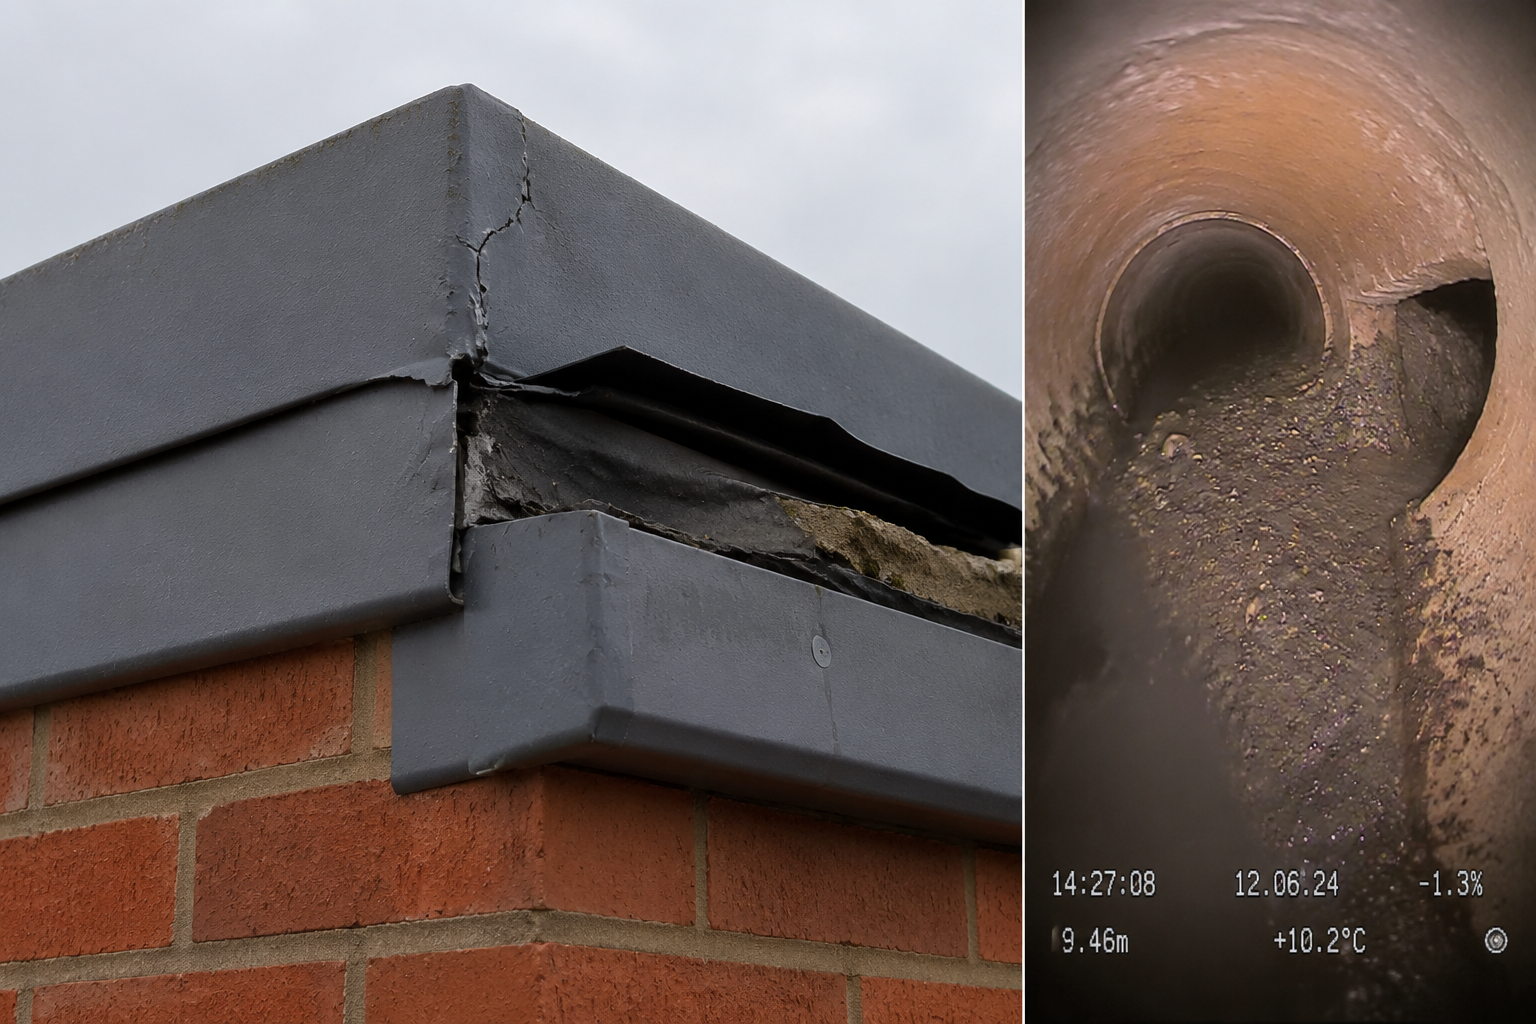
Fast-track construction schedules frequently result in drain runs laid without adequate gradient, with misaligned sockets, or with debris left inside pipes. A CCTV drain survey — which should be part of any comprehensive inspection — routinely uncovers root intrusion, silt accumulation, and cracked pipes in properties less than a decade old.
b) Inadequate surface water drainage
Many post-2010 estates rely on Sustainable Drainage Systems (SuDS) — permeable paving, swales, and attenuation tanks — as a condition of planning approval. These systems require maintenance that developers rarely communicate to buyers. Blocked permeable paving and silted attenuation tanks can cause localised flooding within five to seven years of completion.
c) Flat roof and parapet detailing failures
Contemporary new-build design favours flat or shallow-pitch roof sections, particularly over garages, extensions, and bay windows. Poorly lapped membranes, inadequate upstand heights, and missing or incorrectly installed drip edges are frequently found. Water ingress from these areas can remain hidden for years before manifesting as ceiling staining or timber decay.
For properties where drainage concerns are identified, a specific defect survey can provide a targeted forensic assessment of the affected area.
3. 🔇 Acoustic Performance Failures
Acoustic separation between dwellings is one of the most frequently cited complaints among new-build buyers — and one of the least visible defects. Part E of the Building Regulations requires that separating walls and floors achieve minimum airborne and impact sound insulation standards, verified by pre-completion sound testing.
However, compliance testing is carried out on a sample basis, meaning individual plots may fall below the required standard without ever being tested. Common causes include:
- Resilient bar fixing errors — bars touching the plasterboard they are supposed to isolate
- Acoustic floor screed discontinuities — breaks in the screed that allow flanking transmission
- Services penetrations — pipes and cables passing through separating elements without acoustic seals
- Party wall mortar droppings — debris bridging the cavity in masonry separating walls
A surveyor cannot replicate a full acoustic test during a building inspection, but they can visually assess the construction details, check for obvious flanking paths, and recommend specialist acoustic testing where the construction appears non-compliant.
4. 🧱 Masonry and Render Defects
Despite the prevalence of brick-and-block cavity wall construction in post-2010 UK housing, masonry defects remain common. Key issues include:
- Mortar joint inconsistency — thin beds, voids, and poorly filled perpendicular joints that reduce weather resistance
- Cavity wall tie corrosion — accelerated in coastal or high-exposure environments where stainless steel ties were substituted for cheaper alternatives
- Render cracking — particularly in monocouche render systems applied to poorly prepared backgrounds, leading to water ingress at hairline cracks
- Efflorescence — white salt deposits indicating moisture movement through masonry, often pointing to inadequate DPC installation or bridged cavities
5. ⚡ Mechanical, Electrical, and Plumbing (MEP) Deficiencies
New-builds come with modern systems, but modern systems installed hastily can fail early. A thorough survey should flag:
- Boiler flue terminals positioned too close to openable windows (a Building Regulations breach)
- Underfloor heating manifolds with air locks or unbalanced circuits
- Electrical consumer units without adequate RCD protection
- Cold water storage tanks in uninsulated loft spaces (a freezing risk)
- Waste pipe gradients that are too shallow or too steep, causing slow drainage or siphoning of traps
6. 🪟 Window and Door Installation Defects
uPVC and aluminium window systems dominate post-2010 new-builds. Common installation defects include:
- Missing or incorrectly positioned cavity trays above window heads
- Inadequate mastic sealing at frame perimeters, allowing wind-driven rain ingress
- Failed sealed unit glazing (identified by internal condensation between panes)
- Doors that bind, drop, or fail to meet fire door certification requirements in flats
What a Level 3 Building Survey Should Test and Document
Understanding common defects in post‑2010 new‑build housing is only half the equation. Knowing what a thorough building survey should uncover before the warranty runs out is equally important — because the quality of the inspection determines the quality of the outcome.
A RICS Level 3 Building Survey is the most comprehensive inspection available to residential property buyers and owners. For new-build properties approaching their warranty expiry, the following elements are non-negotiable.
Essential Survey Components for New-Build Warranty Inspections
📷 Photographic Evidence
Every defect must be photographed with context shots (showing location within the property) and close-up shots (showing the nature of the defect). This documentation is essential when making warranty claims.
🌡️ Thermal Imaging
Thermal imaging should be conducted in heating season (October to April) when the temperature differential between inside and outside is sufficient to reveal cold bridges and insulation voids. Results should be interpreted by a surveyor with thermography training.
💧 Moisture Readings
Calibrated electronic moisture meters should be used at all external walls, ground floor junctions, and areas beneath windows. Elevated readings above 20% WME (Wood Moisture Equivalent) in timber elements require further investigation.
🚿 Drainage Assessment
At minimum, a visual inspection of all accessible drainage. Where concerns are identified, a CCTV drain survey should be recommended. For a focused assessment of a specific drainage concern, a specific defect report provides a cost-effective alternative to a full Level 3 inspection.
📋 Defect Schedule
The survey report should include a prioritised schedule of defects, distinguishing between:
- Category 1: Urgent — immediate safety risk
- Category 2: Significant — requiring attention within 3 months
- Category 3: Maintenance — monitor and address at next maintenance cycle
🔍 Services Assessment
Visual inspection of all accessible mechanical and electrical services, with recommendations for specialist testing where concerns are identified.
When to Commission the Survey
| Timing | Action |
|---|---|
| Month 18–22 | Commission Level 3 survey — allows time to compile warranty claim before Year 2 deadline |
| Month 23 | Submit formal defect schedule to developer |
| Month 24 | Builder's warranty expires — all outstanding claims must be logged |
| Year 3–10 | NHBC structural cover only — non-structural defects are your responsibility |
For homeowners who have already passed the two-year mark, it is still worth commissioning a survey before Year 10 to identify any structural defects that remain within NHBC's cover period. A chartered building surveyor can advise on which defects are likely to fall within the remaining warranty scope.
How to Use Survey Findings to Make a Successful Warranty Claim
Identifying defects is only the beginning. Converting those findings into a successful warranty claim requires a structured approach.
Step 1: Obtain the survey report
Ensure the report is produced by a RICS-accredited surveyor — this carries professional weight in any dispute with a developer.
Step 2: Notify the developer in writing
Send a formal letter (recorded delivery) attaching the defect schedule. Reference the specific warranty obligations under the NHBC Buildmark or equivalent policy.
Step 3: Allow reasonable access for inspection
Developers are entitled to inspect defects before agreeing to remedy them. Keep records of all communications and site visits.
Step 4: Escalate if necessary
If the developer disputes findings or fails to respond within a reasonable timeframe, escalate to the NHBC Resolution Service or the New Homes Ombudsman Service (established under the Building Safety Act 2022).
Step 5: Consider independent expert witness support
For complex or high-value disputes, an expert witness surveyor can provide testimony-grade evidence to support legal proceedings.

Frequently Overlooked Defects Worth Checking 🔎
Beyond the headline categories, experienced surveyors frequently encounter the following defects that buyers often miss:
- Loft hatch insulation — inadequate or missing insulation around loft hatches, creating a significant thermal bridge
- Soil pipe fixings — clips spaced too widely, allowing vibration and noise transmission through floors
- Meter box sealing — gas and electricity meter boxes set into external walls without adequate air sealing, allowing cold air infiltration
- Garage-to-house fire doors — non-compliant doors or frames that fail the 30-minute fire resistance requirement
- Boundary and drainage disputes — unclear ownership of shared drainage runs or boundary features, particularly relevant for freehold share considerations in new-build flat developments
Conclusion: Act Before the Clock Runs Out ⏰
The common defects in post‑2010 new‑build housing are well-documented, predictable, and — crucially — remediable at the developer's cost if identified before the warranty expires. Thermal bridging, drainage failures, acoustic shortfalls, masonry defects, and MEP installation errors are not rare exceptions; they are the routine findings of any competent Level 3 inspection on a modern UK housing estate.
Actionable next steps:
- ✅ Check your warranty expiry date — locate your NHBC Buildmark certificate and note the Year 2 and Year 10 dates.
- ✅ Commission a Level 3 Building Survey at least six months before the two-year builder warranty expires — this gives time to compile, submit, and negotiate your claim.
- ✅ Request thermal imaging as part of the survey specification, particularly if the property was built between October and March when thermal anomalies are most visible.
- ✅ Include a CCTV drain survey in the inspection scope — drainage defects are expensive and frequently hidden.
- ✅ Engage a RICS-accredited surveyor whose report will carry professional authority in any warranty dispute.
The cost of a thorough building survey is a fraction of the remediation costs that fall to homeowners once warranty cover lapses. In 2026, with construction costs at record levels and developer accountability under increasing regulatory scrutiny, there has never been a stronger case for independent inspection before the clock runs out.